
|
|
Old V1 Display (no longer produced):
I've uploaded a video demonstration
and a commentary of the
use of one of the prototype Version 1 devices.
Info
The Consult LCD Display is able to connect to vehicles supporting the NISSAN consult
diagnostic protocol (usually evidenced by a 14 pin grey diagnostic connector located
near the fuse box), supporting most NISSAN cars produced in the 1990s.
The LCD Display is "two circuits in one", either having the LCD communicating with
the car's electronic control unit (ECU) and displaying information on the 40x2 backlit
LCD display, or used as a consult interface to faciliate the connection of a laptop
for extended datalogging or diagnostics (whereby the LCD will not be able to communicate
with the ECU). There is a switch on the top of the device that switches between
LCD (left) and Consult Interface (right). You can use the
ECUTalk Consult Software on a Laptop/Pocket PC with the display set to Consult
Interface.
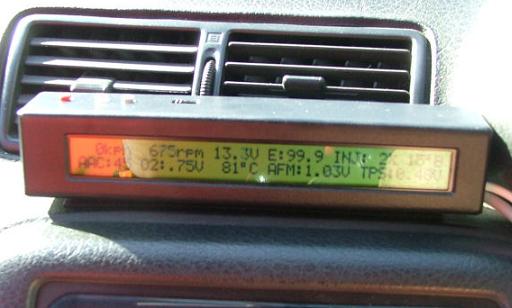
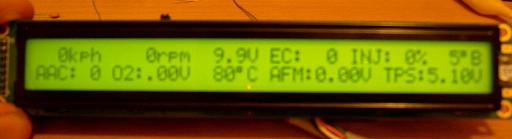
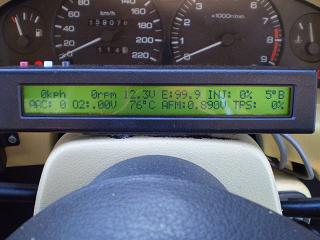
In LCD Display mode, the device communicaties with the ECU and displays from 9 to
11 raw sensor values (depending on car), along with a calculated injector duty cycle
and instant fuel economy values. The layout of these values is shown below:
line 1: speed, rpm, battery voltage, economy (L/100KM when injector/number of cylinders
are setup correctly), injector duty cycle (LH/RH bank for supporting models, eg
GTR), ignition timing
line 2: AAC %, o2 sensor (LH/RH for supporting models, eg 300ZX/GTR), coolant temp,
AFM (LH/RH for supporting models, eg GTR), TPS
Screen below (from a pre-production display) shows an example output (this isnt
hooked up to a running car, so most sensors arent showing any values):
Hardware
The device is 188mm wide, 37mm high (39mm with buttons) and 28mm deep, and weighs
around 300g (depending on cable length). It is quite compact is takes up only slightly
more than the LCD display itself does (which is 182w x 33.5h x 14d without connector).
The enclosure for the device is custom made for this purpose (which means final
cost is a bit higher than I'd have hoped, but it looks really good). This means
there are many convenient mounting positions, such as on the steering column or
on the dash.
It has a right side and a rear holes for possible cable exits. It has two cables
from the device - one for the integrated consult interface (serial connector, plug
into serial port on laptop) and one to the consult port (genuine consult connector).
The device itself has 3 buttons (red, white and grey/black) on the top of the device,
going left to right from the left of the device. The buttons are used to navigate
through menus and the different features of the device. The red, or leftmost button,
is the enter/select button, which either initiates the menu (from the main display
screen) or selects the currently selected item from any other menus/screens. The
white (left) and grey/black (right) buttons control the position of the cursor mainly
in any of the menus. It should be pretty easy to work it out when you use it, so
no user manual is required.
About 10mm to the right of the buttons is a switch (only slightly above the surface,
and might not be very visible in the picture). This switch selects between lcd display
(LEFT) and consult interface (RIGHT).
The screen is a standard 40x2 backlit screen, wide temperate (-20 to +70 operating,
-30 to +80 storage), and has the best viewing angles ive yet to see in a 40x2 screen
(50 above, 60 below, and 40 left or right), let alone a wide temp version which
is needed for keeping in hot cars (pun intended).
Functions
The Display contains a switch to switch between LCD Display and integrated Consult
Interface (as explained above). There are 3 buttons that are used to access the
extra functions of the LCD Display. The leftmost button is a menu/enter/ok button.
The next two are left/right. The final release has the following functions:
- Sensor Display (the default, as picture above).
- Read Error Codes: Shows code number, short description (no need to look it up),
and number of times the engine has started since code last recorded. Up to 3 are
shown at once.
- Clear Error Codes
- Peak Values: Highest values recorded for relevant sensors since car turned on. Can
be reset manually
- Configuration options: Speed kmh/mph, TPS Volts or percent (percent requires manual
setup of minimum/maximum TPS points), Temperature degrees C/F, Economy L/100KM (which
has cylinder number and injector size setup) or alternate fuel economy (10 * speed
divided by injectory duty cycle). Options are stored and retained when car is turned
off.
- Time Trials (0-60, 0-100, 0-160, 400m): Records distance, time, and stores best
time (retained when car turned off).
- Integrated serial Consult Interface (similar to what you'd buy for $100 on it's
own elsewhere)
This module sold 50 units during Q4 2006, mostly to Australian users. Feedback and
suggestions from these users have been incorporated into the Version 2 display,
which is currently in development (see top of page).
|
|